Lets face it, FileMaker’s ‘Show Custom Dialog’ script step is not very attractive let alone customisable.
Yes you can customise the text that appears on the dialog box such as title, message and button names – but you cannot customise the look and feel and you certainly cannot customise it to match your solution’s theme.
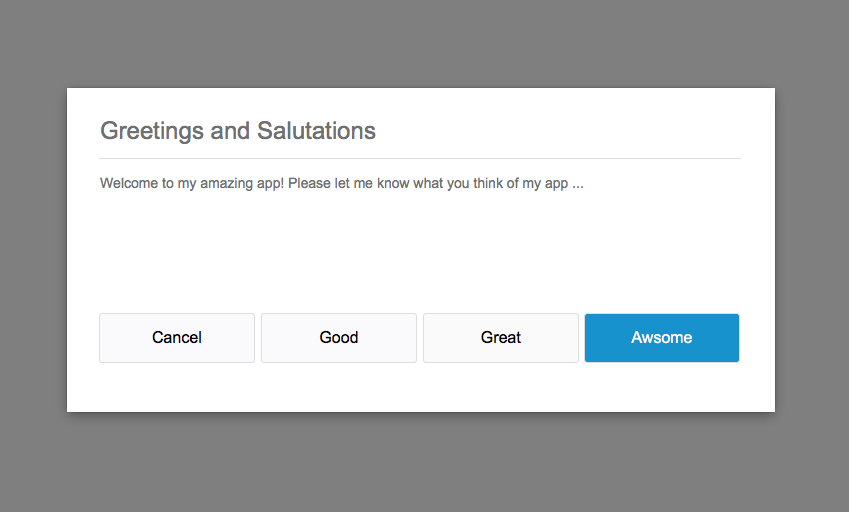
With FileMaker 16, you can now have Groovy Dialog boxes that look like this:
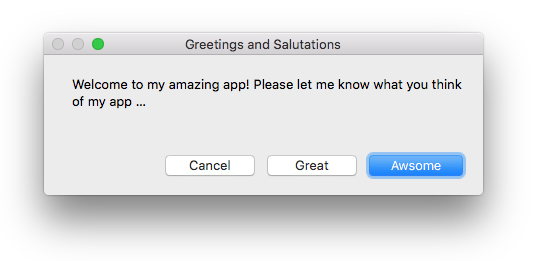
And you can finally get rid of boring dialog boxes that look like this:
Oh, and did you notice anything different about the Groovy Dialog box above?
It’s got 4 buttons instead of being limited to just 3. Actually you can add as many buttons as you like, but 4 is plenty in my opinion.
How easy is it to display Groovy Dialogs?
Easy! Very easy!
Instead of using the ‘Show Custom Dialog’ script step, you use the following Perform Script step:
Perform Script ["Groovy Dialog", "Title|Message|Button1|Button2|Button3|Button4"]
That’s it – pretty easy right?
Lets build it together …
There are several parts to this – a layout, a custom function and 2 scripts. But they are relatively easy to set up and follow along, but if you’re strapped for time, feel free to checkout the demo files at the end of this post.
Ok, so lets get started …
Designing the layout
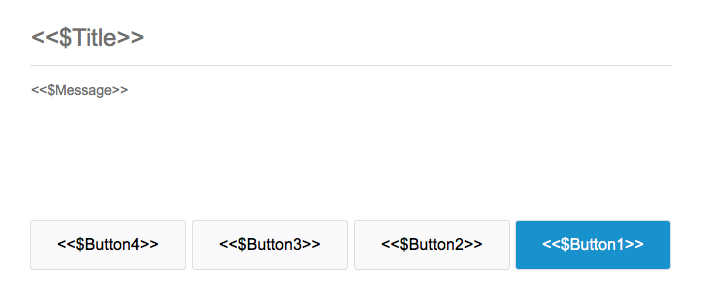
First of all, I created a new layout called “Groovy Dialog” and designed how I wanted it to look. I Added text objects for Title and Message and 4 buttons. I also added a horizontal rule between the title and message.

Then I specified the merge variables for each of the objects. I choose to go with $Title, $Message, $Button1, $Button2, $Button3 and $Button4. If you’re not familiar with merge variables, they allow us to display temporary data on a layout. Check out FileMaker help documentation for more info.
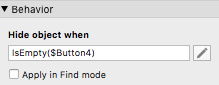
Next, I specified that Buttons 2, 3 and 4 should be hidden when their variables are empty. This basically allows the buttons to be optional – so if you don’t specify Button 3 and 4, the dialog will only show 2 buttons (Button 1 and Button 2).
To hide the buttons, you will need to set the ‘Hide object when’ property within the Inspector for each of the buttons:
Just remember to set the right variable for the right button:
Button 2:
IsEmpty($Button2)
Button 3:
IsEmpty($Button3)
Button 4:
IsEmpty($Button4)
Note: I didn’t set Button 1 to hide as there is no need to hide the default button as there will always be at least 1 button shown on the dialog.
The button script
At the last step, I created a layout for the dialog box but I never set any scripts for the 4 buttons.
For this, I simply created a script called “Button” with a single script step as follows:
Set Variable [$$ButtonResult; Get(ScriptParameter)]
When the user clicks one of the 4 buttons on the dialog box, the script ‘Button’ is called and each button passes a parameter of either 1, 2, 3 or 4 to allow us to identify which button was actually clicked. I.e. did the user click on button 1 or button 2?
The script then sets a global variable called $$ButtonResult with the button number that was clicked.
Later in your script you can use the $$ButtonResult global variable to determine which button the user clicked – think of this as a replacement for Get(LastMessageChoice).
Setting up the buttons
Now it’s time to set up the 4 buttons on the dialog layout.
For each button, I assign the ‘Perform Script’ action calling the script ‘Button’ that I created at the last step.
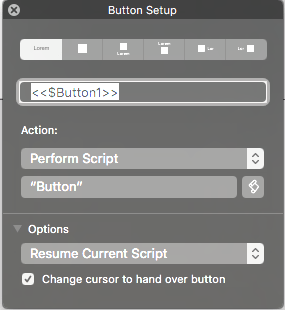
However, the for each button, I specify a different script parameter as follows:
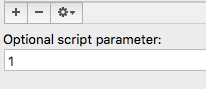
For Button 1 I pass 1 as the parameter, for button 2 I pass 2 as the parameter and so on.
I also set up the button to ‘Resume Current Script’ and also check ‘Change cursor to hand over button’.
The ‘Resume Current Script’ simply allows the paused script to continue to run, whereas the ‘Change cursor to hand over button’ changes the mouse pointer into a hand whenever it hovers over the button.
Adding a Custom Function
At the start of this post I showed how easy it was to display a Groovy Dialog, i.e. via a single ‘Perform Script’ command.
The script that displays the Groovy Dialogs takes multiple parameters, i.e. Title, Message, Button1, Button2 etc.
However, unfortunately FileMaker scripts can only take a single script parameter whereas we need to pass multiple.
FileMaker Developers have come up with many creative ways to pass multiple script parameters – however the method I prefer to use is to seperate each parameter with a pipe command ( “|” ).
I have created a Custom Function which I use for this purpose – however I’m not going to get into detail about how it works other than say that it lets you pass multiple script parameters and parse them on the other end.
Here’s the Custom Function I use:
//Name: GetScriptParameter
//Parameters: Number
Let (
	string = Substitute ( Get ( ScriptParameter ) ; ["¶" ; "xxRETURNxx"]; ["|"; "¶"] );
	Substitute(GetValue ( string ; Number ); "xxRETURNxx"; "¶")
)
The Groovy Dialog Script
Once the custom function is set up, I created a new script called ‘Groovy Dialog’. This script takes multiple parameters and is the script you need to call in order to display a Groovy Dialog box.
This is how I set up my script:
Set Variable [ $Title; GetScriptParameter(1) ]
Set Variable [ $Message; GetScriptParameter(2) ]
Set Variable [ $Button1; GetScriptParameter(3) ]
Set Variable [ $Button2; GetScriptParameter(4) ]
Set Variable [ $Button3; GetScriptParameter(5) ]
Set Variable [ $Button4; GetScriptParameter(6) ]
New Window [ Style: Card; Using Layout: "Groovy Dialog" ]
Set Variable [ $$Button Result; 1 ]
Pause / Resume Script [ Indefinitely ]
Close Window [Current Window]
All these script steps above are self explanatory – except the New Window script step which I have set up as follows:
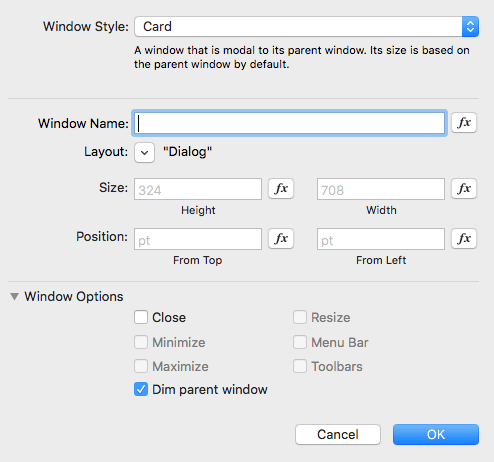
I set the Window Style to ‘Card’ which uses the new ‘Card’ window in FileMaker 16.
I also unchecked the option ‘Close’ which removes the ‘X’ close button that FileMaker adds to the card window by default. I got rid of this button as there was no way to resume the paused script if the user were to hit the ‘X’ button – this meant that once the dialog box was closed, the script remained in a paused state. So removing the close button was the easiest thing I could think of.
Explaining how the Groovy dialog Script works
First we load all the variables i.e. $Title, $Message, $Button1 etc. from script parameters. However as mentioned earlier, FileMaker doesn’t handle multiple parameters so instead I’m using a Custom Function called ‘GetScriptParameter’ to parses the parameters.
Next you will see a New Window script step. Here, a new card window is displayed the user.
Following this, I set a global variable called $$ButtonResult to 1. The global variable is used within your scripts in place of Get(LastMessageChoice) to identify which button the user clicked. If the user hits their Return or Enter key instead of one of the 4 buttons, then it’s assumed the user hit the default button hence why $$ButtonResult is set to 1 here.
Then we pause the script – this is so that we can wait for the user to click on one of the 4 buttons. Card windows are already modal and normally don’t need pausing. But since this can be used within other scripts we need a way to pause and wait for user input – especially if they hit the Enter key.
And finally, we close the card window.
Too long, I just want to copy and paste
If you just want to copy and paste this into your own solution here are the steps:
- Download the demo files.
- Copy the Custom Function from the demo file over to your own solution.
- Copy the scripts from the demo file over to your own solution.
- Create a new blank layout in your solution called ‘Groovy Dialog’.
- Remove the layout’s header and footer.
- Copy the contents of the Groovy Dialog layout from the demo file over to your solution.
- Edit the ‘Groovy Dialog’ script within your solution and set the ‘New Window’ step to use the ‘Groovy Dialog’ layout.
Thats it – you’re ready to groove!
Download Demo
You can download the demo file here: Groovy Dialogs
Sorry everyone, the demo file was the wrong file – problem sorted.
Great work! This is the kind of detailed content that make a great FileMaker blog. Thank you =)
Hi Tony, I think this is great. Would be nice if you could customize the button colors based on code – i.e. If the alert is a warning have a yellow button, if it’s a danger alter (such as delete) have a red button etc.
Any chance you can add something like this in?
Nice. I’m definitely using this in my FileMaker solutions. Thanks.
I am extremely impressed with the tutorial. Very detailed. Thanks for sharing.
Heya! I just wanted to say great article. I like the clean design you chose to go with – was it bootstrap inspired?
Hi Heather, not intentionally, but yes, there is some resemblance to bootstrap.
Thank you for sharing the technique. I love that it’s so easy to incorporate into existing solutions. I’m all for making my FileMaker solutions looking more professional.
Excellent post. I’ve been using new windows for dialogs for many years, but the new card window in FileMaker 16 is awesome. Thank you and best of luck.
I love this technique! However while i was converting all my custom dialogs script steps with this new groovy dialog i found a error that i can seem to find a way around, maybe other have solved this issue….fm16 appears to only allow one card window at a time, so in my solution i have a script that allows user to select a customer or contact from a list picker layout that pops up in a card, when a error occurs a call to groovy dialog is made, but looks like i have to kick the users completely off the first card to show the error card. this is just one of many cases when i have this issue. Would love to hear if anyone found a way around this little problem.
Yes, unfortunately you cannot have nested card windows. You can have multiple windows open, so I’m surprised FileMaker doesn’t allow multiple card windows open.
There is a workaround I have experimented with, but not too thrilled with the way it works.
In order to display the second card window you can open a new regular window thats hidden off screen, and then open a second card window.
Problem is you have to specify the position where you want the second window to be displayed, so you need to calculate it based on the main window. Also, the first card window doesn’t get dimmed, which kind of looks silly to me. Another issue is when closing the second card window, you also need to close the temporary hidden window. You can do with by setting up a script trigger when closing a window.
So yeah, it kind of works, but it’s not great. Would love a better solution.
Hey there, i just wanted to say thanks for the example, I much like the look of the groovy dialogs – cool name too by the way ;)
This is cool! I thought I saw a method at this year’s FMDevCon that used JSON to pass multiple script parameters. I’ll have to check my notes.
Thanks!
Have been looking for a way to get rid of the ugly system based dialogs for some time. Thanks for such a thorough run through of how to make this work. One issue I am running into is variables that existed in the text of my old dialogs are not translating using this method. For instance, I have a script that finds multiple records based off of data that is entered into a global field. Previously I had a dialog message that popped up when a record couldn’t be found and listed the text that was entered into the global field into the message. When I try to insert a variable into the text with the groovy dialogs…it just shows up as the variable ($search). Am I not thinking something through or is this an issue that can’t be resolved in this manner?
Hey Jordan – thanks for the praise.
Yes, you can pass variables. I assume that you may be passing the variable within the string (i.e. within the quotation marks).
The variable needs to be evaluated outside the string so you would need to do something like this: “You are ” & $AgeVaraible & ” years old.”
Very nice but am unable to download the sample file because I don’t have Facebook, Twitter, or G-mail. (I’m not a Luddite, just that I don’t use those services.)
Sorry for the inconvenience – we’ll send it to you via email.
I’m extremely pleased I found this. I want to thank you for making this available for free to the FileMaker community.
That looks very neat! I’ll read the comments tomorrow, before downloading the file. For which, I thank you.
Gгeetings from Los Angeles! Thanks for the clear instructions, I’ve managed to easily add this to my own Filemaker files. If I can do it, anyone can as Im no professional filemaker programer.
Love it and it looks awesome. Thanks!
Just a pity FileMaker don’t allow card windows within other card windows. I kind of worked around it by checking if a card window is already open and if so, just go to the dialog layout rather than opening another window. I had to resize and reposition the card window via script. It’s not ideal but kind of does the job for now. ANyway. thanks for sharing, Its come in very handy.
Very neat, easy to follow. Looks great in my own FileMaker project.
Hi!
I’m unable to receive a Demo Copy of the file “How to create Groovy Dialog Boxes in FileMaker 16” , using this website.
I’ve failed, attempting to download useing both FireFox and Safari on both MAC and Dell computers.
I’m hoping you will either suggest some other means of obtaining this file or perhaps email a copy of the Demo File to my email address.
Thank you.
And this is a very insightful article.
Hi Harriet, I’ve emailed you the download. Enjoy.
Hi! This is exactly what I’m looking for. I was going around in circles thinking it would Really Make Sense to create a single dialog layout, customizable for multiple purposes, but couldn’t quite get there! For learning purposes I’m trying to build your version myself, but am struggling a bit. Would it still be possible to get the demo files via email? I don’t use facebook or twitter; I have a backup Gmail account but your button to download via Google isn’t working.
Question: I noticed that FileMaker says to use GLOBAL $$ merge variables, but yours are not…?
Thank you!
Hi Wendi, I’ve sent the file to you via email. As for the global merge variables, because a script is running while the dialog is shown, local variables are fine – they don’t need to be global.
Hi, this was a tremendous help! Thank you so much for providing this tool. I was able to quickly add into my solution. And, I added the ability to click on the year and be shown 20 years in the past/future while also navigating 10 years +/- at a time. I needed to do this because many of the dates my users are tracking are for birthdates of people born/getting married before 1970. I was intent upon solving my client’s challenge and so I did the work in my client’s files. I’m happy to update the CalendarBox demo with my modular code and provide it if anyone will find that to be useful.
Hi Tony,
Thanks for this, clean and beautiful.
Hi! Great way to replace the Custom Dialog! However, I cannot get the Cancel button to work. Clicking it still continues the script.
Normally after a Custom dialog, I have a Get(LastMessageChoice) = 2 to check if the Cancel button has been pressed. And if so, an “action is canceled” custom dialog is shown. But I cannot get this to work now.
I placed the following script in the Button script after the Set Variable step:
If GetScriptParameter (4)
Show Custom Dialog (“Import Canceled”; “Import Canceled”)
Exit script
End if
The Exit script doesn’t work though and still runs the rest of the script. Any suggestions?
thanks and best wishes,
André
I cannot find the download link for the demo
Hi there, This looks awesome, Id like to implement this. However I cannot get the download link to work. It opens up a Facebook like or a twitter post icon that just cirlcles. Any chance you could email it?
Hi Nik, the download link has been fixed. You can now download it.
Thanks,
Tony.
Can you please send me the demo file?
Hi Jay, the download link has been fixed. Sorry about that :)
Tony
I’ve been thrilled with this card dialog and have been using it frequently. Just encountered a drawback, though… I have a card window where a user can view all our Approval records (without worrying about the modal considerations I’d have to consider were I using a document). I’m setting up a button to allow the user to delete one of those Approval records. But I discovered I can’t use the cool card dialog because… a while a card window can open a Custom Dialog, it can’t open another card. So I’m apparently stuck using the default dialogs. Ugh! Not a drawback to this technique; I’m just disappointed I can’t use it to give them a neat Warning dialog!
Thanks Wendy. Yes this is a drawback, I hope that one day FileMaker can support nested Cards dialogs.